Posts mit dem Label Tutorial werden angezeigt. Alle Posts anzeigen

Mittwoch, 18. November 2009

Tutorial - Gothic Lolita Shoes

Hiya!
Alice Since i got this pretty, pretty dress from the Macabre Hunt which goes perfect with the Frick skins group gift (LOVE Frick), i thought i should make some matching shoes ;-)
So today we make some simple black goth loli shoes, including the sl shoe base.
Pls note that you should have a basic understanding of building for this tutorial, if you dont: stop reading here and look at my older tuts!
Goth loli shoes 1
First create a cylinder and make a copy of it (press shift key down and drag it), apply similar settings as above. This will be the sole of our shoe.

Goth loli shoes 2
Next make a copy upwards and change it into a torus.

Goth loli shoes 3
Same goes for the other zylinder.

Goth loli shoes 4
Make a sphere, settings as above. Dont worry if the prims dont have clear seams, we will tint it black later so nobody will see :-P

Goth loli shoes 5
Another copy of the torus and again, settings as above. Position it in a way we have a clean side same as...

Goth loli shoes 6
...this torus. Let there be no open edges!

Goth loli shoes 7
Now back to the front of the shoe, copy the torus into a sphere and make it smaller till it looks like in the picture. Dont be too shy with the hight, let it be a bit "bumpy".

Goth loli shoes 8
Then its time to make a clear edge. Make a little torus (settings as above, u guess it), position and rotate it around your foot till it looks pretty and clear. After that close the two holes with another torus, remember that it only have to look clear at the edges, not in the middle.

Goth loli shoes 9
Because we wanna go all frilly and girly we need a bow^^
We make it with two zylinders (settings on the left) and two longer zylinders (settings on the right), enable flexiness for all of them! As finish make a little torus between both bow zylinders as knot.
Alternatively you could make the bow like in the mini top hat tutorial^^

Goth loli shoes 10
Looks like a shoe, huh? But still a bit plain and who want so wear a wooden shoe anyway?
Select the whole shoe *except* the bow parts, go to texture tab and tint it black.
Then Select only the bow and change the wooden texture to "empty", which is a plain white. I also turned full bright on, but thats optional.
Ready with the coloring, select the whole shoe with the sole-zylinder as last one and link it ( strg & L / ctrl & L). Right shoe is ready, yay!
Make a copy of the shoe (same way as making copies of single prims) and move the bow to the other side.

Goth loli shoes 11
Attach both shoes to your feet and align them. Pretty, arent they? ;-)
But as soon as u stand up from your posestand you´ll realize that they sink into the ground.
Rightclick the folder your shoes are in and select New Clothes -> New shoes, then rightclick yourself and go into appearance menu.

Goth loli shoes 12
In the shoe menu set shoe height (the first option) to 0, change the color to black and platform height until the feet slightly swell out of the shoes. Save and go into edit menu again, move your shoes down until they look good again.
Finish!
You can find my shoes for free under the freebie tree on the mainstore roof, they are mod so you can take a close look at all pieces!
Shoes ad

Mittwoch, 21. Oktober 2009

Tutorial - Mini top hat

Hat 1
Hello everyone to a new tutorial!
its been a while since i made the last, but i realy couldnt think of anything tutorial-worth what doesnt exist already.
But now its halloween and this hat reminds me of one of my first outfits so...yeah.

hi und wilkommen zu einem neuen tutorial!
ist ne weile her seit meinem letzten, aber ich konnt nix finden das tutorial-wert wäre und nich schon existiert. Aber nu is halloween, ich hab ein paar fotos gemacht und dabei ein paar teile eines meiner ersten outfits gefunden so...yeah.

Hat 2
start with rezzing a torus (rightclick on the ground, create, leftclick on the ground)
possition it above your head with similar sizes - depends on your head and how big u want the top hat to be.
then apply the settings as in the picture, i know they´re in german but i stroked the important parts red so u just have to copy the numbers in the right fields.

fangen wir an indem du einen torus erschaffst ( rechtsklick auf den boden, erstellen, linksklick auf den boden)
positionier den torus über deinem kopf mit ähnlicher größe wie bei mir - muss nich genau so sein, kommt auf deine kopfgrösse und geschmack an.
alle anderen einstellungen (die rote eingekreisten-wärst nich draufgekommen huh? ;-P) so wie im bild oben.

Hat 3
make a copy of it with holding shift key down and draging the torus upwards.
in the objects tab make it a cylinder and apply the settings shown.

mach eine kopie indem du feststelltaste (die wo buchstaben gross macht) gedrückt hälst und den torus mit der maus nach oben ziehst. in der objekte karteikarte mach einen zylinder draus und die einstellungen wie oben.

Hat 4
make another copy of the cylinder upwards, this time without taper and thinner. make sure the lines align well!

mach eine kopie vom zylinder nach oben (nach oben, wirklich...damits in der mitte bleibt), diesmal ohne verjüngung wie im bild oben. pass gut auf das die kanten aufeinander passen!

Hat 5
when you´re done with that, go to the textures tab. click on the left little square with the wooden texture, in the pop up menu click "blank" to get it completely white.
almost looks like a hat already, but we need conrast!
over the edit tabs activate "select texture", this is important as we only want to change single sides of the prims now. select the outter edges (as in the pic) and tint them black (click on the "color" square).

nun zu den farben: öffne die textur dateikarte, klick auf das linke quadrat mit der holztextur, im pop up menü das sich dann öffnet klick auf " leer" damit ganz weiss wird.
schaut doch schon fast wie ein hut aus, fehlt nur noch bisschen kontrast!
oben links (über den karteikarten) mach ein häkchen in "textur auswählen", das ist wichtig weil wir jetzt nur einzelne seiten der prims farbverändern wollen. wähle die äußeren seiten (wie im bild) und färbe sie schwarz (klick das "farbe" quadrat).

Hat 6
activate the "position" again, copy the upper cylinder downwards and make it completely black, also a tiny little bit smaller.
this will be the base for our...

danach aktiviere "position" wieder, mach eine kopie vom oberen zylinder nach unten und färb ihn komplett schwarz, außerdem sollte er ein klein bisschen kleiner werden.
das wir die basis für unsere...

Hat 7
Ribbon!
make another torus, tint it black and -again- apply the settings as shown.

Schleife!
mach noch einen torus, färb ihn schwarz und -wieder- die einstellungen wie oben gezeigt.

Hat 8
make a copy draging it downwards, NOT to the sides please, you will have seams.
rotate it 180° so it looks like a mirror and carefully move it to the upper torus until the edges touch.

nun mach eine kopie davon nach unten, NICHT zu den seiten oder du hast kanten (bzw ne menge arbeit beim positionieren).
dreh das ganze um 180° so das es aussieht wie eine spiegelung und beweg es ganz vorsichtig nachoben bis sich die kanten berühren.

Hat 9
that done, select both while holding the shift key down and make a copy of both. rotate both bow parts till they look like a real bow, dont just keep them straight.
when you´re happy with it move them to the hat until they touch the cylinder.

damit fertig, halte die festelltaste nach unten und wähle beide teile aus, mach eine kopie von ihnen. dreh beide teile bis es aussieht wie eine richtige schleife.
wenn du mit dem ergebnis zufrieden bist beweg die schleife zum zylinder so dass sie sich berühren.

Hat 10
make a cube, tint it black and apply the objects settings as shown, also enable the flexy option in the settings tab. there is no need to mess with the suboptions, just make sure they are active ;-)
this poor prim gets tortured a lot and might be a bit harder to rotate, but this way its realy thin.

mach einen quader, färb ihn schwarz und füge die einstellungen wie oben im bild ein, außerdem geh zur eigenschaften karteikarte und aktiviere "flexibler weg". nur aktivieren, das reicht schon ;-)
die arme prim wir ganz schön von uns verstümmelt und ist vlt etwas schwieriger zu rotieren, aber so wird die schleife schön dünn.

Hat 11
again, move it to the bow, make a copy and rotate both till they look good. you can also play with the lenght (i made mine a little bit smaller) or add more of them - thats all up to you!

und wieder, beweg das band zur schleife, mach noch ein kopie und rotiere beide bis sie gut aussehen. du kannst auch die länge oder breite verändern (hab meine noch etwas kleiner gemacht) oder mehr hinzufügen - das is alles dir überlassen!

Hat 12
the hat looks nice already, but i want a bit of detail. so i made a sphere (settings as shown) and positioned it around the cylinder. dont forget to rotate them a bit as we have taper in that cylinder!

sieht doch schon ganz gut aus, aber ich will noch ein paar details. also habe ich eine kugel gemacht (größe etc wie oben), kopiert und um den zylinder positioniert. wenn du das auch machst, vergiss nicht sie ein bisschen zu beugen da wir verjüngung im zylinder haben!

Hat 13
when you are happy with everything its time to link all pieces together and finish it. hold shift down and select all pieces of the hat with the big cylinder as the LAST ONE. this is important as it will be our main prim and center of rotation!
with all selected press crtl and l.
it should glow blue now, with only the big cylinder glowing yellow.

wenn du mit allem zufrieden bist wird es zeit alles zu verlinken. halte feststelltaste gedrückt und wähle alle teile des hutes aus, den großen zylinder als LETZES. das is wichtig weil die letzte prim die wir auswählen automatisch die "mutterprim" ist und das zentrum der rotation!
alle ausgewählt drücke strg und L.
jetzt sollte alles einen blauen schein haben, nur der große zylinder einen gelben.

Hat 14
now rightclick the hat ->attach to-> head -> nose
well, i used nose, u can use other points too but NOT skull...thats the point where ususaly your hair is attached to. u dont wanna be bald under the hat, do u?
and yeah, i know how stupid i look on that pic but with a bit of adjustment...

jetzt rechtsklick auf den hut -> anhängen-> kopf -> nase
naja ich hab nase gewählt weils bei mir grade frei war, andere punkte wie kinn oder mund gehen auch...NICHT schädel, das ist der punkt wo normal deine haare sind. du willst nich glatze unter dem hütchen haben oder?
und ja, ich weiss wie blöd ich auf dem bild ausseh mit dem hut im gesicht, aber mit ein bisschen positionieren...

Hat 15
...tadaa!

of course the variations are endless here, if ya make something pretty or need help with this tutorial: IM me! or better: Notecard me!
what probably wont happen since nobody reads this blog anyway, but who cares^^
i will put my hat here for free under the 5 linden tree on mainstore roof
>>>Here<<<

tadaa!
die variationen sind endlos was man noch so verändern könnte, mach was dir gefällt!
wenn du was damit gebastelt hast, hilfe brauchst oder fragen hast: IM mich! oder besser: schick mir eine Notiz!
meinen hut findest du kostenlos unter meine 5-linden- baum auf dem dach meines ladens
>>>Hier<<<

Hat end

Sonntag, 12. April 2009

Tutorial "Veil"

hiya!

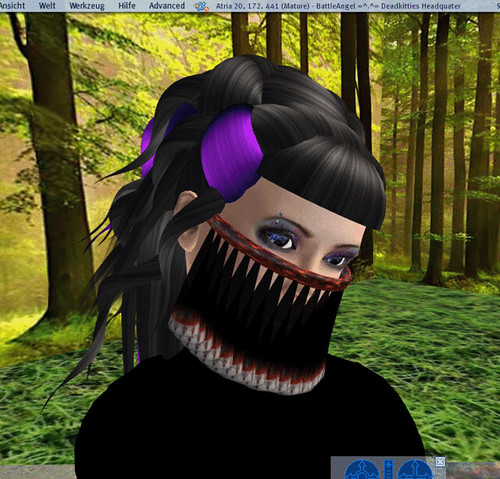
today we make a simple veil you can wear as free women, on costume parties or just because you like it^^

this is what we´re going for:


first you have to create a torus (rightclick on the ground, select "create" and then the torus shape). apply the following sizes:
x = 0.090
y = 0.170
z = 0.170

hole size x = 0.15 y= 0.05

for me the sizes are slightly different like yours maybe too.
then position the torus over your nose like...well, like a veil should ;-P


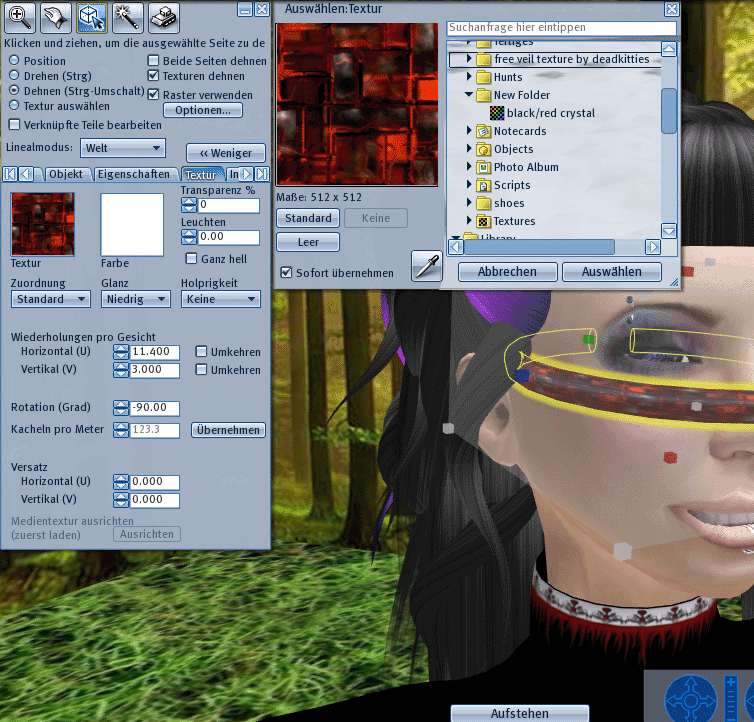
go to the textures tab and leftclick the left square, a new menu appears. select the free black&red veil texture with the settings:
repeats per face: horizontal 11.400 vertikal 3.000 rotation -90.0

(or whatever looks good for you)


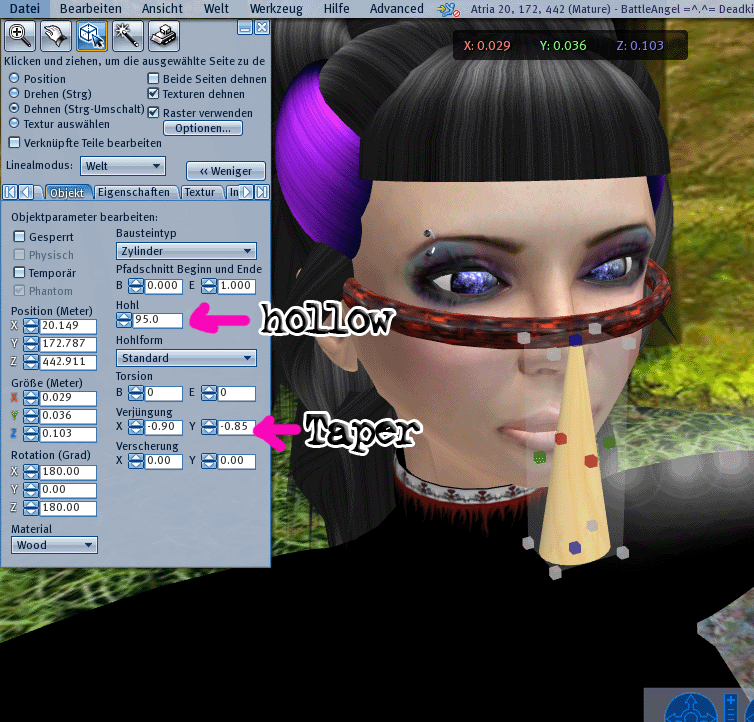
create another prim,
a cylinder and apply the settings and position like in the following picture:


go to the options tab and activate the flexyness, you can leave the default settings.

back to the textures tab and select the free veil texture, apply settings like in the pic:

veil4

now make a copy of that prim:
press shift and hold this key down, and drag the cylinder to the side until you get a second one and position that new one under the torus. make as much cylinders as you need to cover your face. should look something like this then:

veil5

when your ready and everything is covered we only need some final steps...while still in the build menu rightclick onto the screen (just anywhere)and keep the right mouse button down. now move the mouse over the veil we just made until its completely inside the yellow square your mouse makes now. when you got that, press ctrl down and leftclick the torus two times. this will deselect and select it again, making it our motherprim
(the last prim you selected will always be the mother prim, while all others are the "childprims". this is important for the way you can move object later)

veil6

press ctrl + l down at the same time to link our linkset together and finaly get the veil :-)
the torus should glow yellow now, while the rest is in blue or without glow (happens for small flexi prims sometimes...no idea why). almost done now, you only need to rightclick the veil and from the pie menu select "attach to" --> "head" --> "nose"
it will attach to you immediately, but you need to reposition it again...but if you´ve come this far, it wont be a problem for you ;-P
that was the last step, i hope you liked this tutorial and wish you good luck with it!
if you have pictures of what you made: sent me, sent me^^

veil7

Dienstag, 3. März 2009

Tutorial "Retro Bangles"

hiya^^

bangles1 thats me after some freebie shopping^^

pretty retro, but some accessories are missing. so we will make some simple dark bangles today.

das bin ich nach etwas freebie shopping^^

sieht schon recht retro aus, aber es fehlen noch ein paar accessories, darum machen wir heute ein paar einfach, dunkle armreifen.

go to a place where you can build and rez a torus on the ground, then apply the settings as in the pic below:

geh zu einem platz wo basteln erlaubt ist und erschaffe einen torus, übernehme die gleichen einstellungen wie unten auf dem bild:

bangles2

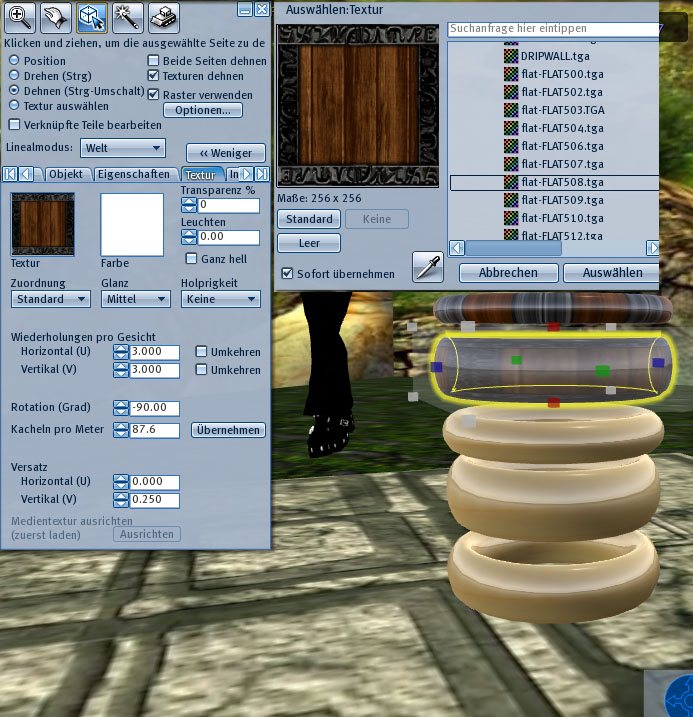
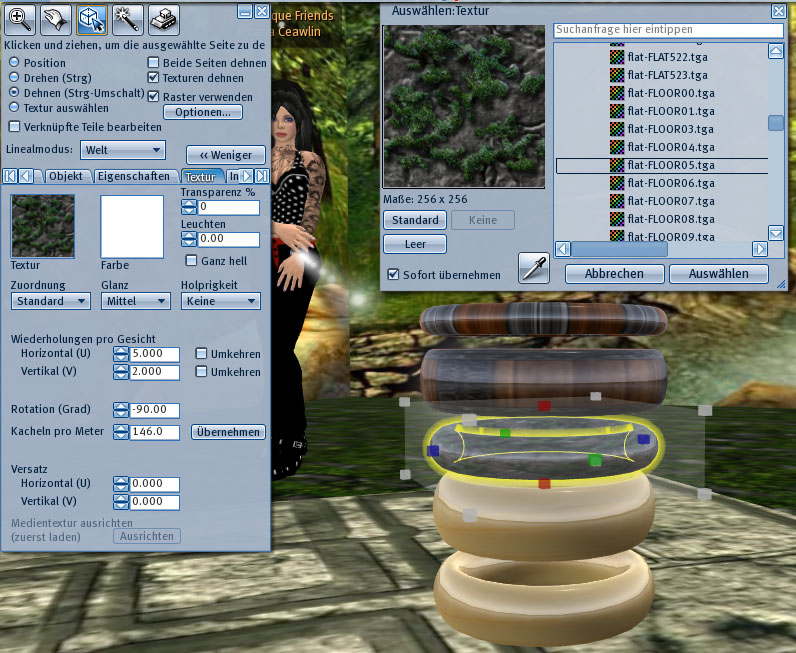
now make 4 copies of that first bangle along the z axis (the blue one). to do so press the shift key down and drag the bangle upwards. to the five bangles , from top to bottom, apply the settings as shown in the pics below:

jetzt erschaffe 4 copien von diesem ersten armreif entlang der z achse (die blaue). um das zu machen halte die umschalt taste (die wo große buchstaben macht ;-P )gedrückt und zieh deinen armreif nach oben. dann übernimm für die 5 neuen armreifen (von oben nach unten) die einstellung der bilder hier unten:

bangles3

bangle4

bangle5

go from the objects to the textures tab now and select for every bangle shinniness --> medium

should look something like this now:

wechsel vom objekt zu den texturen einstellungen und wähle für jede armreif aus glanz --> mittel

sollte danach so in etwa aussehn:

bangles6

so far, so good

but still looks a bit plain with only wood^^

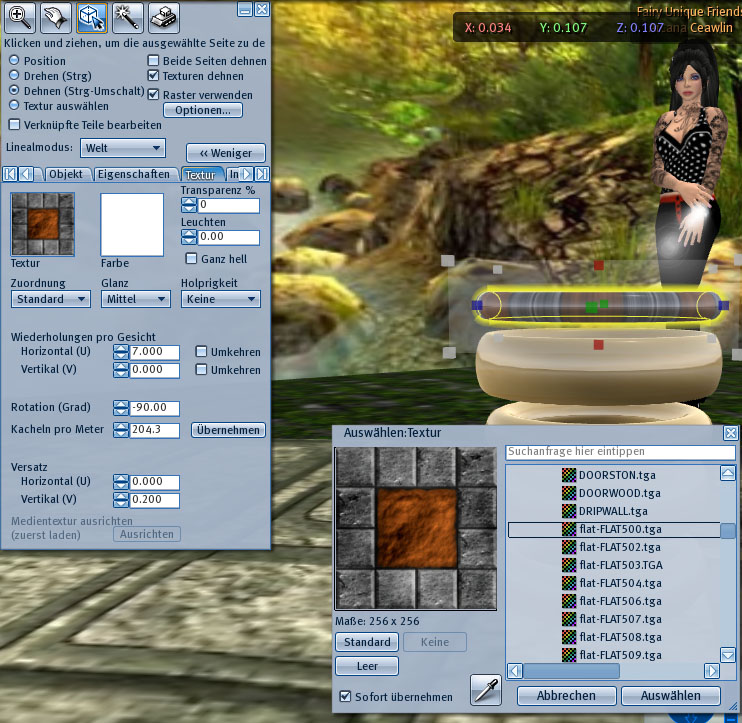
i used some free textures you can get at slx (or xstreetsl...whatever) here

apply the settings as below (yeap, i like pics)

so weit, so gut

sieht aber immernoch etwas langweilig aus so ganz aus holz^^

ich hab freebie texturen benutzt die du bei slx (xstreetsl...wie auch immer) kriegen kannst und zwar hier

übernimm die einstellungen wie unten gezeigt (jup, ich mag bildchen)

bangles7 bangles8 bangles9 bangles9 bangles10

looks pretty good, huh? of course you can play with the settings and textures. if you like the result its time to link them together. select all bangles (hold shift down and select one after another), the one in the middle should be the last one, and press strg and L. now name it "Dark banlge left", right click on it and take.

schaut ganz gut aus, huh? du kannt natürlich auch andere texturen und einstellungen probieren, ganz wie´s dir gefällt. wenn du das ergebniss magst wird es zeit fürs verlinken. wähle alle armreifen (shift gedrückt halten und mit linker maustaste alle nacheinander anclicken), der in der mitte sollte der letzte ausgewählte sein, und dann drück gleichzeitig strg und L . jetzt gib ihm nur noch einen namen wie "dunkle armreifen links", rechtsclick drauf und nehmen.

bangles11

search the bangles in the objects folder in your inventory. rightclick them --> attach to --> left forearm

you will have to rotate and position them though

such die armreifen in deinem objekte ordner im inventar, rechtsklick drauf --> anhängen an -->linker unterarm

du wirst sie noch etwas rotieren und verschieben müssen damit sie passen

bangles12

then, thats it! we´re finished!

congrats to your new, unique bangles :-)

das wars schon! wir sind fertig!

gratuliere zu deinen neuen, einzigartigen armreifen :-)

bangles finish